Basing your minis pt 1
All your Base!!!! Turning cork into slate. Basing tutorial!
This is one way of turning a cork place matt into a slate
and moss base for your miniatures
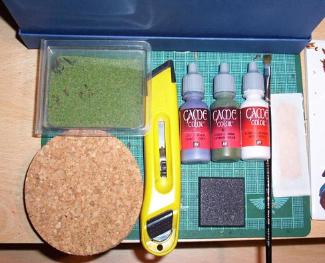
First off you'll need these items
A piece of cork about 3mm thick,
A very sharp box cutter,
Cutting surface.
Grey paint either sombre grey or GW shadow grey.
Green paint either kamen green or GW catachan green,
White paint.
PVA glue,
Largish paintbrush.
Green flock or foam flock.
A plastic base i used a monster base just so you guys n girls could see it but this work at any size.
A plaster *in case you cut off your hand*
And the love of a good women. * mines probably reading this* I wuv yoo hunee*
This is what ya do.
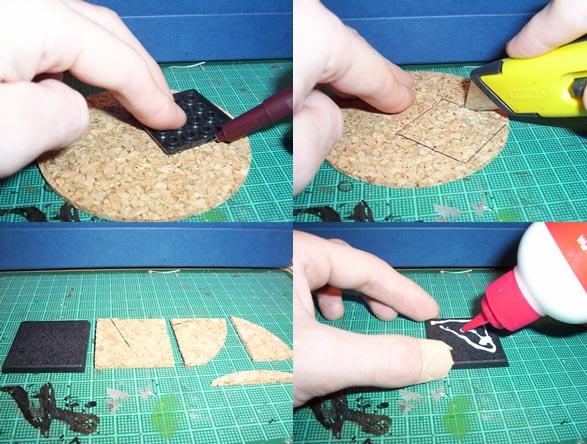
STEP 1.
Take your plastic base and lay it top down on the cork, draw around it using a pen or pencil.
Take your box cutter and carefully cut out the shape you've just made.
Dry fit this to your base to make sure its the right size and shape.
Cut some extra bits smaller than the original to build up your base with.
Apply some PVA glue to the top of your base.
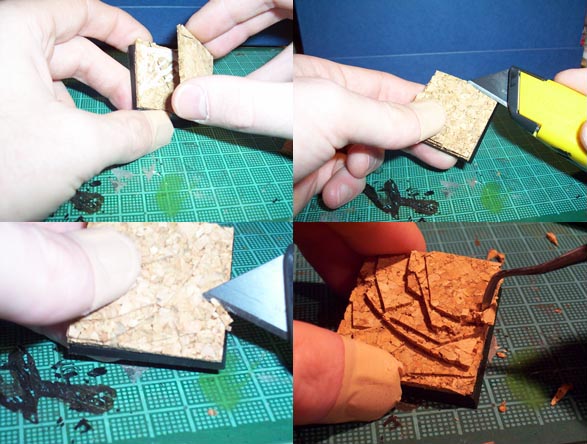
STEP 2.
Glue down the cork to the base.
Apply more PVA to sections of the cork and stick down your extra bits of cork to give it some height.
Allow to dry fully.
Take your box cutter and cut into the side of the cork making it half as thin in some areas, cut between
3mm and 5mm into it, then cut down into the top of your cork and remove the waste.
Again with your box cutter cut small v shapes into the cork to simulate chipped rock, only cut halfway
through the cork otherwise it will fall apart.
Then grab a sculpting tool or a pin and pick bits of cork out diffusing the look so it doesn't look so man
made and gives it a more natural feel.
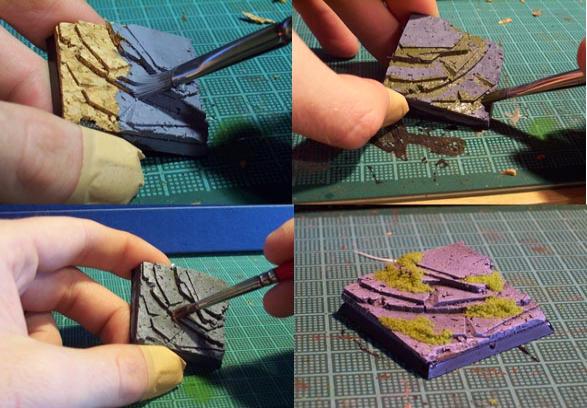
Step 3.
Paint the whole thing in your base grey colour. One part paint, one part water, the cork will drink this
up and you'll have less cork showing through if you miss any.
Allow to dry.
Next paint the dark green into the cracks and chips you made with your cutter.
Allow to dry
Now drybrush the cork the original grey colour, then mix some white into the grey and give it another
drybrush.
Do this once more with a touch more white just to bring out the edges.
Apply small amounts of PVA where desired and sprinkle your flock.
Allow to dry.
The last thing you have to do is re affirm the base edge i chose black but any colour will do, this
neatens the whole thing.
And Bingo! You've just made one base ready for a miniature to be pinned onto.
Now the only thing left to do is make yourself a nice cuppa tea and feel proud of yourself.
Whole armies like this turn heads.
Its also an easy way to make your display figures look a little bit more special.
Good luck and if you have any questions or comments feel free.
Joygasm!
This is one way of turning a cork place matt into a slate
and moss base for your miniatures
First off you'll need these items
A piece of cork about 3mm thick,
A very sharp box cutter,
Cutting surface.
Grey paint either sombre grey or GW shadow grey.
Green paint either kamen green or GW catachan green,
White paint.
PVA glue,
Largish paintbrush.
Green flock or foam flock.
A plastic base i used a monster base just so you guys n girls could see it but this work at any size.
A plaster *in case you cut off your hand*
And the love of a good women. * mines probably reading this* I wuv yoo hunee*
This is what ya do.
STEP 1.
Take your plastic base and lay it top down on the cork, draw around it using a pen or pencil.
Take your box cutter and carefully cut out the shape you've just made.
Dry fit this to your base to make sure its the right size and shape.
Cut some extra bits smaller than the original to build up your base with.
Apply some PVA glue to the top of your base.
STEP 2.
Glue down the cork to the base.
Apply more PVA to sections of the cork and stick down your extra bits of cork to give it some height.
Allow to dry fully.
Take your box cutter and cut into the side of the cork making it half as thin in some areas, cut between
3mm and 5mm into it, then cut down into the top of your cork and remove the waste.
Again with your box cutter cut small v shapes into the cork to simulate chipped rock, only cut halfway
through the cork otherwise it will fall apart.
Then grab a sculpting tool or a pin and pick bits of cork out diffusing the look so it doesn't look so man
made and gives it a more natural feel.
Step 3.
Paint the whole thing in your base grey colour. One part paint, one part water, the cork will drink this
up and you'll have less cork showing through if you miss any.
Allow to dry.
Next paint the dark green into the cracks and chips you made with your cutter.
Allow to dry
Now drybrush the cork the original grey colour, then mix some white into the grey and give it another
drybrush.
Do this once more with a touch more white just to bring out the edges.
Apply small amounts of PVA where desired and sprinkle your flock.
Allow to dry.
The last thing you have to do is re affirm the base edge i chose black but any colour will do, this
neatens the whole thing.
And Bingo! You've just made one base ready for a miniature to be pinned onto.
Now the only thing left to do is make yourself a nice cuppa tea and feel proud of yourself.
Whole armies like this turn heads.
Its also an easy way to make your display figures look a little bit more special.
Good luck and if you have any questions or comments feel free.
Joygasm!